Showing posts with label Michael's hutches. Show all posts

Sunday, May 31, 2020

An old time kitchen shadowbox -start to finish


I started with smooth 1/4" birch plywood. I used to always be able to get a nice quarter sheet of good plywood from the lumber yard, but now it seems that it's more a question of just how warped is it? Once the pieces for this project were cut, and I began to dry fit them, I found that at least one or two of them were warped just enough to not want to cooperate completely. When a project depends on two or more pieces being smeared with glue and butting together in perfect harmony, and they don't, well that can be a tragedy. Or, you can work around it and make everything work together, meaning, you glue the heck out of everything.

My project was a little old fashioned cottage hearth kitchen, so of course, there's a fireplace. I didn't want the fireplace to stick out really far, but at the same time I wanted one deep enough so that I could actually put a pot or something well inside it. For this reason, I decided to build a couple of false walls, and here you see my false walls surrounded by real? walls, with an indentation for a fireplace in the middle.

This shows how the false walls fit and how they'll be attached with supports.

Here we step back and see how the pieces will fit together.


In the past I've used miniature clay bricks, or fake stones I cut out of plywood scraps to line my fireplaces, but since I wanted to keep this kitchen simple, I thought I'd opt for painting the inside of the fireplace a nice, well used, sooty black. I applied the paint, and when dry sanded it smooth, adding on another coat of black to even out the color.

I also decided to have a hook inside the hearth from which I could hang a cookpot, so I decided to make an extra support for the front of the fireplace, in order to screw in the hook. In the picture above, you can see 3 supports for the fireplace front, one of which is painted black. If you look carefully, you might be able to see the black hook, and a small hole where I screwed the hook in the first time. I made a mistake and had to turn the "beam" the other way.
The next picture shows all the pieces of the structure glued together. See? I reminded myself of what I had to do next by writing a message on the wall "glue all".


Next I started work on the interesting parts of the kitchen. At first I thought I might make it be a log cabin, but since the last two houses I did were log, I decided against it. I considered board and batten walls, but decided against that too. Those are the walls made of vertical boards with narrow slats that cover the seams where the boards meet. Ultimately I decided on stuccoed walls, a sort of in-between plaster, not too rough, not too smooth, just lumpy enough to be interesting.
I thought about cutting out a window in the false wall, maybe adding a light to illuminate a scene, but decided that would take me into the realm of complicated instead of simple. In the first place, I knew I'd need more room back there for a brighter light, so the false walls would have to be moved forward, etc.,etc., and the whole roombox would wind up bigger than I wanted it to be. In the second place, I didn't really feel like doing it. Therefore, I decided to make a false window on my false wall.


About drywall compound or spackle as it’s also known, there are people who swear by one brand or another. I’ve only tried a few, and have no favorite brand as of yet. There’s also two kinds of the stuff, wet and heavy and the fluffy kind. Generally I prefer the heavy, wetter one. It tends to stay put where I plop it down more than the fluffy kind does. The fluffy one tends to get away from me. On the other hand, there are those that love the fluffy kind, and admittedly, it is better for some jobs. What it boils down to is, if you’re new to using it, you’ll just have to decide for yourself.

Once I got the window set, I began applying the spackle. In the picture above it’s fairly rough. I wanted to smooth it a bit, but still leave it somewhat irregular, so I used a damp cloth to rub out the higher spots and rough edges. You can sand spackle smooth with either a damp rag, called wet sanding, or with sandpaper or its equivalent. If you want your plaster walls very smooth, I suggest sandpaper. It’s messy, but you can get the wall as smooth as glass if you want to.

While the spackle was drying, I started applying egg carton stones to the chimney face.
I prefer to use cut stones. In most cases I like the look better than the rounded stones.
I had a vision of the chimney front being plaster over stones, with just a bit of the stones’ shape and texture showing under the plaster, so I decided to try it and see how it came out. Below you can see my test area. I rubbed some spackle on the paper stones with my finger. After the spackle had dried a few minutes I was able to gently rub out most of my fingerprints. Since it looked like the method was going to work out ok, I started making and gluing more egg carton stones.

Here’s a larger section. If I had been more careful in my cutting, I could have made the stones butt together perfectly, but in this case, since they were going to be covered with spackle, it didn’t matter. Generally I don’t like the look of a lot of mortar in my stonework, preferring a tightly fitted look.

After I glued on all my stones, I rubbed on the spackle. I decided to use a piece of wood to simulate the stone fireplace lintel. I wanted something that would stick out a bit from the rest of the stones, and have a slightly different texture.
To make the lintel, I used a discarded piece from a Michael’s hutch. It happened to be the right length and thickness. I cut it in half, making it narrower, and sanded the routed edges smoothly. Then I bashed the heck out of it to make a few indentations. I gave it a coat of gray paint, and sanded it when dry. Next I blended white, Payne’s gray, some dull brown, and a flesh tone, and painted it to look stone like.

Below you can see how it looked freshly plastered.


Faux stonework - - -
I wrote about making a stone floor for Tall Chimneys, and once again I’ve used spackle (aka drywall compound), this time to make stones for my hearth.
First I spread on the spackle with a putty knife. It doesn’t need to be really smooth, just click on the picture below and you’ll see.
After letting it dry a few minutes I scored the lines that separate the stones with a pencil. I smoothed out any major ridges or lumps created by the pencil, and used the edge of the putty knife to scrape away any irregular bits along the fronts of the stones, leaving them with a definite edge where they were to meet the floorboards.

Next I left it all to dry. Once dry, I dampened a small rag and began to rub the stones to smooth out the larger lumps and any ridges. I didn’t want my stones to be perfectly smooth, that wouldn’t be natural. I also rubbed out any extra bits of spackle that were on the floor around the front of the stones. You can see the result below.

When making flat paving stones this way, you may find that you left some areas too shallow, so that you’re left with deep dips. That’s not a problem. The floor in Tall Chimneys was my second time working with spackle stoning, and I saw quite a few mistakes after everything was dry, and supposedly ready for painting. I simply spread more spackle in the bigger dips, rescored wherever I needed to and let dry again. You can fix and refix as much as you want, as long as you haven’t painted it.

When I wrote about doing the egg carton stones in the previous section, I wasn’t sure how I wanted to treat the inside of the fireplace. I decided to add a little spackle along the inside front, smearing and patting it with my fingertip. It didn’t need to be done carefully, all I wanted was a suggestion of stonework.

Once content with the way the stones looked, I was ready to paint them.
First I sanded them very lightly. The best thing to use is a thin foam backed sanding pad. You can cut these into smaller pieces if you want to, making them easier to use in small spaces. I think they’re also better for very light sanding, giving easier finger pressure control. Wipe away any dust you’ve made from the sanding, blowing away the last minute bits.
Next I blended a little Payne’s gray with some white paint for the undercoat. Now, you don’t need Payne’s gray, you can use black. I’ve got the gray because I took an art class once to learn about watercolor painting, and the artist teaching the class recommended it for shadowing. Payne’s gray is actually a sort of blackish purple color. If I didn’t have it, I’d be perfectly content with the plain old black.
If you don’t have much experience mixing colors, let me tell you that just touching the tip of my artist’s brush to the Payne’s gray (or black), then blending it with a squirt of white left me with a way too dark gray. I needed to add more white. Sometimes you need just the tiniest speck of black or gray to change white dramatically.
Anyway, I gave the hearthstones their first coat of paint and let it dry.
If you follow these instructions and make a stone floor of your own, after the paint is dry run your finger over your stone work. You’ll feel a bit of grit.
I gently sanded the painted stones, just enough to remove the grittiness, then wiped and blew away the residue, finally wiping with a damp cloth.
Next came the coloring process.
Your stones can be whatever stony color appeals to you. In Tall Chimneys I wanted a warm color for the floor, so I opted for honey toned tans and beiges. If I had made the floor gray, the room would have had a totally different look and feel.
In the Kitschy Kitchen I decided to go with a basic gray.
I used the same colors I used to make the stone lintel for the fireplace, white, Payne’s gray, dull brown, a flesh tone, and a bit of black, mainly for soot.

I blended the white, some Payne’s gray and a touch of brown to make a light gray color and brushed it onto the stones. I didn’t blend the color perfectly, by the way, I left it not quite totally mixed. Next I added a little more brown to one corner of the blended paint on my palette, so I wound up with a section of somewhat browner gray, and I dabbed a little here and there, blending it in to the wet gray paint that was already there. After that I did the same thing to another corner of the paint on my palette, this time with a little of the Payne’s gray or black. If an area looked darker than I liked, I added a tiny bit of white, or flesh tone, working it in to lighten the color. Just keep in mind that I didn’t want the color to be even. You can look at some real stones and see how mottled their colors are.
Meanwhile I also brushed in a little bit of black in the cracks between the stones. This helps to define them, and also looks like ashes caught in the cracks. Any black that creeps onto the tops of the stones can be worked into the overall color.

Next I dabbed some stony color onto the spackle along the sides of the fireplace, working it in with some black paint towards the back sides. When blending the black into the light gray, you pounce backwards with the gray and forwards with the black till they blend in a satisfactory manner in the middle. That’s the best way I can describe it,. You need to practice this sort of thing, and once you’ve got it, you know just what to do.

I mentioned pouncing colors on in the landscaping section when talking about painting grass, shadows, etc. I use an old artist’s brush, one that’s rather worn and splayed out towards the top. I should probably do an episode sometime called “Your old brushes and what you can do with them”.

Lastly, I did a touch up with some black along the back and sides of the fireplace where it meets the hearthstone, and then I blended a little gray with some black to liven up the back of the fireplace.
Oh yes, I also worked in a little more black in the central area of the hearthstone to simulate soot and ashes, and a tiny bit forward, on the stone directly in front. Later, If I feel I need more black, I can work it in.


I visualized my little window as having an interior shutter, so I cut a piece of basswood to size and scored it to simulate boards. I glued the shutter open, so I didn’t need to make any battens for the back. A batten is that board that goes across a door or shutter. The boards that make up the face of the shutter are nailed to it.
I wasn’t ready to glue the shutter when I took this picture, so I just laid it in place. I still had a bit of work to do on the window.
Next I started making the floor boards using “tongue depressors”, that I found at a hobby shop.


I took apart a Michael’s hutch to make the first furniture for the kitchen with the help of my microwave oven.

It took 30 seconds to loosen the glue enough so I could take the 2 sections apart. I was able to just pull them apart with my hands, though I have to say it's not always that easy. Sometimes I've had to slide a butter knife in the slight gap to work them free of each other. I've even had some cabinets snap and break. Thank goodness they're inexpensive.
For those who are unacquainted with Michael's miniature unpainted cabinets, Michael's is a chain of crafts and hobby shops in the US. Miniaturists here have been happily painting, tearing apart and regluing these cabinets for some time now. I am proud to say that I've been nominated as a Michael's Hutch bashing queen a few times.

This, by the way, is what you get if you leave your hutch in the microwave too long.

This was an earlier mistake, and I've learned my lesson. Don't walk away from the microwave!
Here's a picture with a couple of furniture pieces for the kitchen.

The shelf is part of another Michael's cabinet.

I used the top of it to make the cabinet. It took 30 seconds for the glue to melt so I could take it apart. I wanted to remove the interior shelf so I could cut off about 1/8” off its width, but the darn glue just wouldn’t let go. The cabinet got so hot I had to hold it with a towel while I wiggled the shelf, which broke. Not to worry, though, I fixed it, using contact cement.

I used to think that maybe contact cement and rubber cement were the same thing, but I decided to find out for sure. They aren’t. They work similarly , but contact cement is a permanent glue, while rubber cement is meant to be repositionable and was used for years in the art and design community before it was discovered by the general public. I read that rubber cement doesn’t make a permanent bond, items can be pulled apart.

Now, about contact cement. It comes in a tube or bottle. Generally, you spread some on the thing you want to glue, and some on the surface you want to glue it to. Wait 10 or 15 minutes till the glue is dry, then stick the two pieces together and they’re glued. For good. No repositioning if you made a mistake, but also no clamping or holding it in your hand till the glue dries. Sometimes I’ll use it. Other times I prefer wood glue. I used contact cement to reglue the main section of the shelf to the little sliver of it that was left behind inside the cabinet, because I needed it to make a firm bond right away. However, I stained the wood before I glued it. Stain won’t work on glue.
A little note, I prefer contact cement in a tube rather than a bottle. I’ve bought little bottles and found they don’t have a very long shelf life. I don’t use contact cement a lot, and found that each time, glue got hard inside the bottle before I got around to finishing it. Once I found the new bottle I got at the hardware store had already dried, so I returned it. On one occasion I bought a tube, and it stayed wet all the way down to the end, so I prefer tubes when I can find them.
Back to the miniature cabinet…..

I stained it with a reddish stain, Minwax Sedona Red. I wanted some color, and originally had thought about painting the thing, but I didn’t want to do a lot of sanding. Some people just paint the cabinets, and don’t bother with sanding them at all. Others take the cabinets completely apart so they can thoroughly sand each and every piece smooth. I fall somewhere in between. If I paint, I really feel the need to sand the exterior sections till they’re as smooth as possible, and the interiors as well as I can. With stain, there isn’t as much sanding, sometimes you hardly have to sand at all.
So here it is, with a coat of Sedona Red stain.

Also, I wanted the “panes” to be solid, so I decided to cut 2 panels from 1/16th” thick basswood and glue them to the inside of the doors. That’s why I needed to make the shelf inside narrower. I painted one side of each panel black, glued them into place, and stained the backs to match the rest of the inside of the cabinet.
The cabinet reminds me of a Mission style cabinet I have in my family room, which happens to be in a red oak.

Next I wanted to decorate the black panels with folksy artwork.
I drew the designs with a pencil. Pencil marks reflect light, so you can see them on the black background as you shift them toward the light. Next I painted the penciled sections white, and when that was dry, started painting. I used a fine line black marker for lines on leaves, etc. Wherever my stems got too thick, or I wanted to adjust a misshapen leaf, I used a little of the marker or covered up with a little more black paint.

I sprayed the cabinet with Krylon matte spray, and later gave it a few more coats till it was covered with an even finish.

This is the settle that will go into the corner of the room. It’s pretty easy to make. I had to decide how tall I wanted the sides and back to be, then I drew a right angle on paper, and experimented with several variations of S shapes for the curved sides, until I got the look I wanted.
After that I just needed to measure how wide it needed to be to fit into my space, and cut rectangles for the back and the seat.

Another thing to remember is to cut a couple pieces of wood to glue under the seat. This picture shows the one towards the back. These pieces are what really hold the whole thing together. This one is glued to the bottom of the seat, and the back and sides of the settle.

And below you can see where the other one goes, towards the front of the seat. You can make this piece flush with the front of your bench, but I wanted mine to be a little recessed.

Here’s how the bench looks in the room. I hadn’t glued the wall shelf in yet, so I laid the room on it’s back on the floor.
By the way, I decided to do a two toned stain on the hanging shelf. I thought the stain I had put on it originally looked a little bland above the other cabinet, but I couldn’t go darker, because the inside of the shelf had a bit of glue residue. Keep in mind that the shelf was made from a cheap Michael’s hutch, and their gluing is not always the finest.
If you use a light colored stain over a glued area it’s often not too noticeable, but a darker stain will heighten the flaw. Fortunately too, there will items on the shelf that will help cover the lighter areas.
So, to perk up the shelf, I used a light coat of the red stain I used on the cabinet below it, but just on the outside, and along the front face.

I also sprayed the pieces with a satin finish polyurethane varnish.


Miss Frobisher has agreed to serve as a model so you can see the scale of the room.

I decided to give the table base a curve to echo the curve in the bench, and gave the stool straight lines for a little contrast. To make the stool more interesting, I drilled holes in the sides in a sort of petal pattern.
If you want to make a table or bench yourself, here’s a view of the underside, so you can see how the pieces glue together to make a sturdy piece of mini furniture. There’s a light stripe on the piece that keeps the stool’s sides glued in place. That’s because I was originally adding another small piece, which I cut just a hair too short, but then I realized I didn’t really need it anyway. Of course, the more pieces that glue into each other, the stronger your structure (or furniture) will be.

Also, I wanted to add a little “glass” to the window. I could have used a piece of acetate, but I didn’t want the window glass to be perfectly smooth. I could have tried clear nail polish, but I didn’t have any. I was going to brush on some Mod Podge, but then I saw something on my shelf called Liquid Laminate, by Beacon.
I poured a little inside the window frame, then I placed my muntins to form panes, and let it all dry. You can’t see it well in the picture, because it was a bit cloudy and there’s not much of a reflection, but you should be able to just make it out along the lower edge of the window. The liquid tended to get thicker along the sides, but I could pour on some more if I wished. The stuff also acts as a glue, keeping the wood strips, or muntins, in place.


The finished kitchen --
The twig and sunflower wall hanging was made with dried vines, fabric “sunflowers” and artificial leaves.
All the other little accessories, the baskets, skillets, food, etc., are from New England Miniatures, except for a red jar sitting on the shelf. That’s a bead from my personal collection.

I also added ashes in the fireplace. I make my piles of ashes and embers from Paperclay.

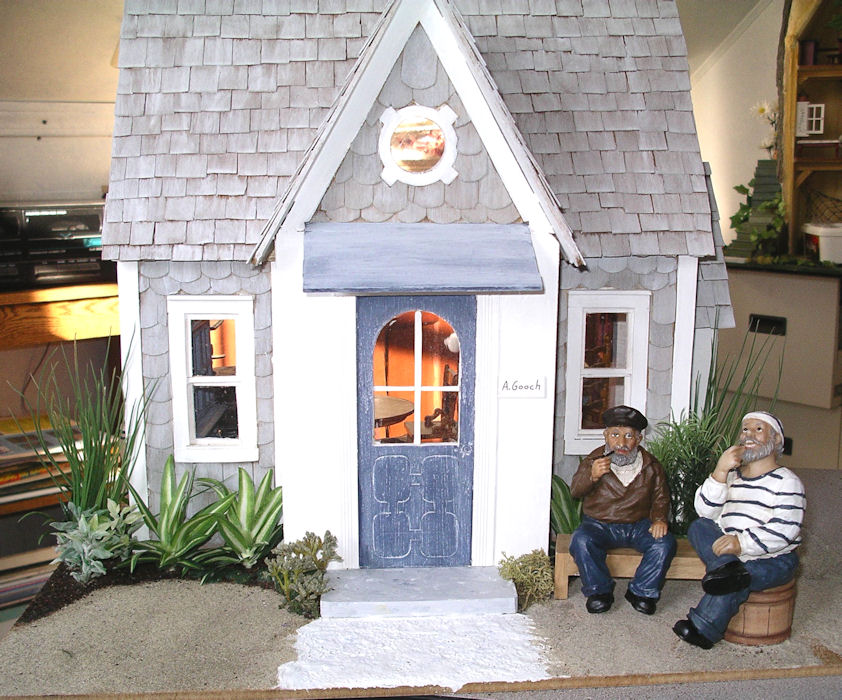
Amos Gooch's Cottage - a Victorian lobsterman's home in 1:12 scale


Here's Amos's backstory.
 Amos was building a home for his future bride, the lovely Persis Huff.
Amos was a lobsterman, back in the 1880's. He lived in Cape Porpoise, Maine. Yes, there really is a Cape Porpoise, so named by John Smith, the Pocahontas John Smith, that is.
One day the circus came to town, and Amos took Persis to see it. That's where Persis met the man on the flying trapeze. When the circus left, Persis packed her bags and went with it, and with the man on the flying trapeze. Persis was later sighted in Bangor wearing pink tights and a spangled bodice in the bigtop.
Amos was crushed.
One day he sailed away into the morning sun, never to be seen in Cape Porpoise again. Some said that he eventually married a widow up in Skowhegan, but no one knew for sure.

This was my first version of the house, it's a Buttercup by Greenleaf.


I had meant to landscape the front, later on, after I did something more to the inside, but I reached a standstill. I knew what I wanted on the outside, but not what to do with the tiny 2 rooms.

I had glued horizontal "boards" to the interior walls. It was a common practice in the 1700 and 1800's to nail boards like this to help keep the house warmer. As a bachelor fisherman, Amos would have found his home to be snug and warm during nor'easters, but his future bride would have preferred a nice wallpaper.

I decided to use some thin birch plywood to cut the floorboards, mainly because a had a leftover piece that would make just the right amount of boards. Waste not - want not. I always save my leftover bits and pieces. You never know when they may be useful.
I should have cut the ends off a little more evenly though. Sometimes I get carried away. It's ok, I'll fix that up later.
I am very proud of my nicely scuffed and worn floor, though.

I started by painting it brown. I thinned the paint with water, so it wound up halfway between a stain and paint. In the old days, people painted their floors, they didn't necessarily stain them. Their color of choice was often brown.
After the paint was dry I used a fine sanding sponge to smooth the boards. Of course, you'd get the most wear and tear on a floor at the door. Amos would probably not have thought to use a doormat anyway. I sanded that area with a little more pressure, just enough to remove most of the paint right where anyone coming in would have put their foot down. Next I needed to decide on a "trail" where there would be added scuffing. For instance, maybe Amos headed for the stove or his favorite chair whenever he came in. The floor would show more wear heading in that direction. I also gave a mild scuffing to the floor in general, but keeping in mind that floors in corners or along walls almost never get scuffed.
Finally, I rubbed the floor a little with steel wool.

Once I finished off a stained floor with waxed paper. I had sprayed the floor with a matte finish to seal it, but when I was done found that the floor was still the teensiest bit rough here and there. I knew from past experience that if I sanded it again, or even just buffed it with steel wool, I'd take some of the stain off. I suddenly thought of waxed paper, and I tried buffing the floor with a piece of it and it turned out great. It had a nice satiny smooth finish, with no obvious shine, just a bit of a luster.

Back to Amos's house......

I had recently read an account about an inexpensive way Victorians decorated their floors, and I wanted to do that in the cottage. They would paint the floor a solid color, then stencil a border around the edges of the room, imitating a carpet. Carpets were expensive, many people couldn't afford them. A fellow like Amos might have decided to paint a pretty leafy border on the bedroom floor to please his darling bride. I decided to just use a light stain on that floor, not paint. I felt the light wood color with the leafy vines would look better.

So there I was, that's as far as I got.
A few years back I bought a Chrysnbon stove kit. I started visualizing it in Amos's house, so I put it together.
I'm beginning to think that after many years, Amos came home to his cottage in Cape Porpoise.
I began to look for suitable furniture.
I found I had a problem. The room was really small. The windows were in the way. Most of the furniture was a little too big to fit to suit me.

I tried out some of the chairs that fit my vision of Amos's house, and as you can see, those 3 chairs alone take quite a bit of room. I do want a couple of chairs that Amos and his pal can relax in, so I'm leaning towards using the ladderback rocker and the firehouse chair.
I decided to use a Michael's hutch. Those hutches are slightly smaller in scale than true 1:12, and they're often just the thing for compact spaces. It tucks into that corner by the window well enough.

I had no idea of what I was going to do with the upstairs. I realized it was too small to suit me as a bedroom. A while ago I had a thought. Maybe somewhere in his journey Amos adopted an orphan child, sort of like Star in the Shirley Temple movie Captain January. That room would fit a little girl just fine. Maybe the widow in Skowhegan died leaving her young daughter in Amos's care?


My original concept for Amos’s cottage was of a house unfinished because of a faithless sweetheart. I had stained the shingles, using Minwax cherry stain, because it was supposed to be a pretty new house.
Now that Amos is older, the house needed to look older too. The shingles should look weathered, so I weathered them with paint.

I used acrylic craft paints, white, Payne’s gray and a small touch of Hauser medium green.
Payne’s gray is a purplish black color, when mixed with white it makes a bluish gray. I can’t exactly explain why I added the Hauser green, it just seemed the right thing to do. It’s how the color Green Earth, or Terre Verte, changes some colors. I was out of Green Earth, and Hauser Green seemed a good substitute.

I started by mixing the colors, then, with some of the paint still on the brush, I dipped the brush in water and began brushing water on the brown shingles.
If you apply the paint directly, the shingles will absorb more paint, and you’ll get a painted look. Wetting them first makes them absorb the paint more like a stain.
On the roof you can see I’m applying the wash quite quickly, the camera couldn’t keep up. I’m slopping it on and spreading it around.
Here I’m applying the gray paint. It’s not very thick, but not runny, either. I just keep brushing it on rather quickly. When you water down a paint, it acts like a stain. The depth of color depends on how much water you add.

After the first coat of weathering gray paint had dried, I applied another coat. You can see the lighter area has the second coat, the browner areas of wall are where I had applied the paint the day before.

It’s going to look a little streaky when it’s done, which is good. A point to keep in mind though, you want your streaks going the right way, up and down, or straight across on horizontal boards like the caps on top of the roof. They should never, ever, ever go diagonally.

Here’s the cottage, nicely stained a weathered gray.

Here’s a picture of my neighbor’s garage.

The color is pretty close. Actually, that garage was originally stained a light green, but to the previous owner’s chagrin, after a dozen years or so the green faded away altogether. Up under the eaves, you can still see a little of the original brown cedar shingles. Amos’s cottage shows a bit of the original brown here and there too. Wherever I had a little brown left in what I thought were the wrong places, I just dabbed on a little watered down gray paint. When it dried, it blended in with everything else.

On the roof edges, where you can see the ends of the shingles, and the plywood roof below, I used straight gray paint, without the preliminary wash. The rough wood absorbs the paint very quickly, and painting them, in the end, gives a stained look anyway.

I also brushed the watered down gray paint on the blue roof and the front door. I gave the roof several brush coats, it gave a nice aged look. I gave the front door one coat, then rubbed some of it off. The gray settled in the grooves of the wood, and mottled a little on the door, and I liked the look. It wound up looking like a door that could use a new coat of paint.

A word about roofing shingles. You may have noticed some of my shingles go a little higlety piggelty, a bit wavy. I just like that look. Sometimes roofing shingles should go on straight, but other times, like on cottages, they add a cuteness factor. I’m a sucker for a cute roof. :)

On the inside, I filled in a few gaps in the “plaster”. I used drywall compound and my usual supple artist’s palette knife. Some knives are fairly rigid. I like the ones that give a bit when pressed. I also decided to try a 1” disposable foam brush to spread the putty around and into the corners where the gaps were. It worked pretty well, working the putty into the gaps and smoothing it out.

When it was time to sand the repairs I used a combination of a foam sanding pad and an emery board. It also struck me that the foam brush might make a good wet sander for a few places, so I dipped it in water, squeezed out the excess and rubbed away. It did a pretty decent job.
By the way, I’ve found that if you cut the end of an emery board straight across, you can get into corners and tight spaces with it. Sometimes I’ll even bend the emery board into an L shape.

Feeling on a roll, with some furniture ideas in my head, and the laundry all done, I spent some time in my studio.

Here’s the Michael’s hutch. I added a couple of nonworking drawers in the middle, where it originally had an open space. Also, I changed the knobs, and gave it a little “wear and tear”.
I sanded off some of the paint in strategic places, like around the knobs, and just below the upper cabinet doors where people might have put things down over and over as they arranged the plates and put things away. A few scuffs on the front corners and along the bottom front would be appropriate too.
I also decided to use part of another hutch to make a low cabinet to go under a window. It was handy, I had already used the top half on another project, and it was just the right size.
I flipped it upside down, using the base as the top, although I trimmed the overhang a bit. Here it is next to what became the blue cabinet as I was working on both of them.
Yes, I added a drawer façade to the low cabinet too. I use scraps of whatever I have handy to make false drawers. For the low cabinet I used a piece of L molding from the lumber yard.
I cut and sanded it to fit the space, then I made a cut to simulate a gap between “drawers”.
Next I applied some glue to the inside of the cabinet and inserted the L molding.
I also filled in the holes where the original knobs were.
I felt the cabinet needed some little feet. Sometimes I’ll use small wooden balls, but this time I chose bun feet. I can’t remember what these little bowl shaped things were called. I don’t think they were miniature bowls, though.
They do make dandy feet for furniture.

I still have to finish painting it and add the knobs.


I was still working on a couple of furniture pieces as I ended the last post. Here’s a picture of one of them, the low, country red cabinet, also distressed.

I was also working on a small dresser. I had an unpainted dresser that had a gouge on one side, too much roughness on another side, and a couple of drawers that didn’t fit very well, so I decided to see if I could salvage any of it.
Below is a picture of a complete unpainted dresser, the upper part of the flawed one and some dollhouse molding. At the bottom of the picture you can see a section of molding that I cut from the longer piece. I trimmed off the scallops, and I’m going to use it to fill in the open bottom of the little dresser.
And thanks to the magic of digital photography, here it is, all finished. I painted it, and added painted wooden knobs.
I needed a bed to go with the dresser for the little girl’s room upstairs. I had a stash of several wooden beds I bought for 50 cents a piece a couple of years ago. The bed was too high, so I cut it down, closer to the floor, and painted it to match the dresser.
I’ve been adding furniture to the main room. I had wanted to include the firehouse chair. It would have been so right for a room like this, but 4 chairs were too many, and 3 different chairs didn’t look right either.
Although I really like this table, it just doesn’t look right to me in this room.

It doesn’t seem to matter what way I turn it, it just doesn’t look quite right. I think there may be too many legs in the picture.
I do have a round table, which does seem to give the room a better symmetry. It’s white, though. I could use the darker brown version, but I don’t think I want a dark table. I could wait for an oak round table, but I don’t want to. I’m on a creative roll here, and I don’t want to stop and wait for a new table that might be a little bigger. This white table is part of Lee’s Line miniature furniture, and it’s just a little smaller than some of the other round tables that are available.

I think I’ll spray the white table with primer, then paint it, either a golden blond color sort of like the chairs or maybe blue like the cabinet.


So, here sit our friends, Amos and Cap’, having a bit out of the jug. Cap seems to be intent on making his point clear. Amos seems to be more of a laid back kind of guy. Amos is the fellow in the striped sweater.
Oh yes, I’d like to introduce Star, Amos’s adopted daughter. Her room seems to be just right for her. She already has her own puppy and a wagon to pull. I think she wants to go berry picking.

Back to the kitchen table which was the right size and shape, but the wrong color. It was white, and the chairs were light oak. Now they're not.

Yes, that's the transformed white table and oak chairs. Originally I was thinking of maybe painting the table blue, like the cabinet. I went to get my can of spray primer, but I had none. I knew we had a can of regular brush on indoor latex primer, but once I got the lid off I discovered that it was full of rust, and no good to me at all. I was ready to paint, but had no primer.
I tried just brushing some paint on the table, but it didn't cover very well, and I knew I'd wind up painting several coats, and sanding, and probably wind up with a mess, but then I noticed something and it gave me an idea.
As I swirled the brush back and forth over the table, it left a pattern, a pattern that reminded me of a very common 19th century faux finish. I cleaned my brush and got out some pleasing looking brown paint.
I simply started brushing brown paint on the underside of the table, then, when the white was covered, I swirled and zigzagged the brush til I was left with a pattern I liked. I did the same thing to the pedestal. After the paint was dry, I found a tiny speck of white here and there, or maybe a section that I thought should have had a bit more color and brushed on a tiny bit more paint where I felt it was needed.
When the paint was dry, I sprayed on some Krylon Crystal Clear acrylic finish. I bought it recently, mainly because it would dry quickly, and I've only used it a couple of times, but so far I like it.
I waited a day or so and gave the underside of the table a gentle scratch test, and it passed, so I started painting the table top, and this is how it came out, once it was had a spray finish.
All I did was brush the paint on, zigzagging the brush back and forth all the way across the table, then I turned the table so I could zigzag the brush going across in the other direction. I let the paint dry, then sprayed on the finish.
I'll give the table yet another coat of finish later on. NOTE: It's now 2020 and  the table still looks fine.

I'd seen similar patterns in faux wood graining on 19th c. furniture, and if Amos could paint that pretty leaf pattern on the bedroom floor, he could certainly have painted this table during a cold Maine winter.
I painted the chairs the same way, only I decided to paint the spindles black for contrast.
You may have noted a couple of other additions to the room. There's a large pelican. I believe Cap' carved it as a gift. There's also a new oil lamp hanging over the table.


Next  I began work on the front yard.
Here we see Amos and Cap having a smoke out front. Amos is sitting on a napkin ring, yes a napkin ring. I found this unpainted wooden napkin ring and it reminded me of those old time kegs that came in assorted shapes and sizes, so I set it aside til I needed it. Cap is sitting on a piece of broken coaster set holder.
OK, I bought a set of coasters, and they came in a wooden tray, but once I opened the package I saw the tray was broken, which didn't matter, I never use those holders anyway. The two halves of the holder did look like benches, though. I'm still not sure if Cap prefers the bench or another seat, he hasn't expressed an opinion.

First, I needed to decide on the front walk. Originally, I thought maybe sand, but then decided that wouldn't be right, a crushed shell walk would be better. I was NOT however, about to start pulverizing sea shells to make them small enough for 1:12 scale. I decided to try and easier route, that old standby, drywall compound.

You're seeing it unpainted, and still damp. I spread some glue on the base, then spread on the stucco. Next I used a stipple brush, the kind you use for stenciling, and started pouncing the brush up and down all over the stucco. This made quite a few pointy bits that stuck up, so I waited a while til the compound had begun to set and dry a little, then used my finger to pat the pointy bits down.
Hopefully, after I've painted it, it will look like crushed shells.

You could do the same thing to give a wall that rough stucco look. It also reminds me of some of English houses I've seen in some old photos. They had rough stucco with pebbles in them, sometimes they were larger, more like small stones. I seem to remember a dollhouse made around 1900 with the same look. You could stick tiny pebbles in the stucco.

Next I started on the soil.
I wanted a mix of soil and sand,with a bit of grass. Since I've used painted sand to simulate grass in the past, I thought I may as well sand one side of the yard and see how it went.
I started by spreading some glue on the base, and then spreading some sand on it and pressing it down. Then I remembered my can of spray adhesive and thought I may as well try using it to glue on the rest of the send. It would certainly be better than having a glue coated finger.
I sprayed some adhesive in the rest of the section, shielding the wall with a piece of cardboard. Then I spread some sand and patted it down. After several minutes I brushed off the loose sand, first with my hand, then a soft brush.
It looked pretty good, but I felt I needed more sand, so I resprayed and added more sand, repeating the process as before.
I found that as I brushed off the extra sand, It just kept coming off tiny bit by tiny bit, so I decided to try spraying adhesive over all of it to keep it in place.
It stayed tacky for a while, and I started to worry a little, but as it dried it got firmer.

Next I painted some brown dirt for planting areas, and decided to try out some plants.
I found a great looking silk spider plant on sale a while ago. The baby plants hanging on the trailing stems were perfect for mini gardens. Two of them are in the corner.

I had also found two little clay pots with plastic grass "growing" in them. I thought the grasses would be great in some mini gardens, and I could use the pots for planters. You can see a section of tall grass behind the other plants.
I'm not sure if I'm going to use the tall grass in Amos's yard yet or not. I merely drilled the holes to I could stick some plants in temporarily, to see how they'd look.
I wish I could do that in a real-life garden. Invariably, I'll plant something, and then, when it's growing, wished I'd planted it somewhere else or maybe a foot or two over.

More work on Amos's yard.
First I glued some "mulch mix" in the planting areas out in front of the house. I'll often just paint in my dirt, or maybe mix a little sand with the paint, but this time I reached for the coffee grounds-tea leaf mixture that I used for the Bungalow's garden. I felt I needed more texture to contrast with the sand.

Next I glued in the plants. As you can see, I did decide to use the tall grass, using some shorter ones to blend everything together. That old standby filler, reindeer moss, helps as a ground cover, hiding lumps of glue or plastic.

I felt I needed something else along the side of the house besides plants. A barrel seemed to be a good choice.
And now it looks like this.

I started by painting the inside of it a dark brown. Next I used some dark brown and a lighter, warmer brown color. Color names don't really matter, since brands use different names for the same or similar colors. The dark brown looked like milk chocolate, the lighter brown looked more like nutmeg.
I dipped my brush in water, then in the darker brown paint and started squiggling the brown paint on part of the outside of the barrel. Then I dipped the wet brush in some of the nutmeg color and started squiggling it on, overlapping the wet paint and dry, fresh wood. I more or less sqiggled them together, then while the paint was still wet, I wiped the barrel with a paper towel to get the extra paint off. This way you wind up with a stained look rather than a painted one. Of course, I could have used stain, but it was down in the basement and I was up in my studio over the garage and I didn't feel like going all the way down then all the way back upstairs.

Anyway, you get a more aged effect using the paint. As always, when you want to try something like this, try it first on pieces of scrap wood. It's an easy technique, but you have to get a feel for it.

When the paint was dry, I used a black Sharpie marker to draw in the lines for the boards. They don't have to be perfect. Afterwards, I painted on the iron bands with black paint.
For the scrap lumber I just used the bits and pieces of wood I saved from other projects. I stained them with watery paint, rubbing off the extra paint before they were dry. I used a few different shades to make them look more interesting. I poured some wood glue into the bottom of the barrel, and stuck in the scrap wood.

I used more scrap pieces for the stack on the ground, also staining them with paint. I used hot glue for the top plank that's sort of diagonal, wood glue for the rest.
I spread a little glue on the base, sprinkled on some sand, and then artfully arranged some more greenery to make everything blend together naturally.

Here's the front of the house as it looks now. I still need to finish applying sand to the right hand side, and I feel the yard still needs a little something in the foreground on the left.

I used the wooden, unfinished napkin ring to make a keg for Amos to sit on. I cut a top out of basswood, and sanded the edges a bit so it wouldn't stick out, then I stained it with some brown paint thinned with water. I applied two different shades of brown. If my cans of stain had been at hand, I could have used them, but the paint was handier. I applied it just like a stain, paint on, wipe off. I used first one color, then another. Just a reminder, if you want to use paint like a stain, water it down. Also, there are acrylic stain mediums you can buy, if you prefer. Just mix the medium with an acrylic paint, and it becomes a stain.

Some barrels and kegs are held together with iron bands, while others used wooden or leather straps. Since my napkin holder had wider, rounded lips at top and bottom, I decided to go with the wooden strap look.

I blended a little water into a brown paint, and applied it to the rounded lip of the napkin ring, doing a section at a time.I immediately wiped off the excess paint.


I also gave the walk a coat of paint. It's supposed to represent crushed shell. below you can see it partially painted.

Here's what my pallette looked like. There's white and Payne's Gray on either side, and in between is a mixture. The very white parts of the picture are just reflected light. I'll mix a bit of paint and apply it to the walk, then dip my brush in lighter or darker paint as I need to. The walk should be white, but not pure white. The variations in gray need to be subtle.
Here's a view of the new section of garden.

More sand has to be glued onto the board, and I may still add a few more little plants.The side still has to be done. I'm thinking of painting the sand to simulate soil, to make it all look a little more interesting, and I still want to add a bit more greenery along this side of the house.


Yesterday afternoon I finished playing about with Amos's garden, and I wanted to get some pictures before the sun went down.
A few people thought there should be a seagull somewhere. Well, I bought some seagulls several years ago when I first got the idea for Amos's cottage. They've been hanging around waiting for a place to settle themselves ever since. One has settled atop Amos's roof.

Star has been playing at cooking in the side yard. She's been preparing a tasty leaf stew. I hope she remembers to pick up her toys before it gets dark.
I suddenly felt I just had to have some antique style lobster buoys, which were final items I added to the front yard. The other seagull is nearby. The Victorian front yard just cried out for a birdbath.

The side of the cottage.

Here's a closer look at the lumber pile and the bouys.

To make the dirt, I first glued on some sand using a spray adhesive, just as I did for the sandy area in the front of the house. After brushing off the loose sand, I painted the remaining sand with brown paint. Some of the sand stuck to the paint as I went along, but it didn't matter, plenty of sand was left in place.
After the paint was fairly dry, I sprinkled a little more sand here and there. I thought I was going to need to spray on a little more adhesive to keep it down, but it turned out that I didn't need to.

Here's a closer look at the dirt.


Amos and Star are happy with their cottage.
The fellows are having a convivial drink to celebrate. If you peer through the doorway, you might see Amos's cousin Angus. Amos has his cup all ready for him. Angus is also a Maine lobsterman, just like Amos and Cap'.

Here's a better view of Angus.

The last things I did were to add a few recent aquisitions and some curtains for the living room.

I wanted the cottage to have the same kind of curtains it would have had in real life, simple panels strung on a piece of string, the simplest type of curtains there are, only not in mini. Not for me, anyway. It would have been easy to just glue them to some string and have them in the closed position, but I wanted them open.

I remembered I had some Stiffy fabric stiffener, so I decided to see how stiffened panels would come out. I cut small squares from the sleeve of a lightweight summer shirt (it never looked good on me anyway), and wet them with the Stiffy. I then folded them into tiny pleats and let them dry. I used small clamps on the tops so they could dry flat so I could string them. I think I should have tried pinning the lower ends of the folds, so the bottoms wouldn't flatten out, but we live and learn. The next time I stiffen curtains, I'll try running a pin through the bottom sections of the pleats. You might also be able to do this with liquid starch intead of the Stiffy. I didn't have any starch, so I didn't try it.

Making them wasn't very hard, but hanging them was. There may be a simpler method, but it didn't occur to me, so this is what I did.
With a needle, I ran a piece of thread through the backs of the curtain tops. Next I drilled small holes in the window frames where the threads were going to be attached. I used the smallest Dremel drill bit for this. I then snipped some regular sewing pins down to @ 1/4" long, saving the end with the head. If the knotted end of my thread was on the correct side, I could push the pin through the knot, then dip the pin in glue and push it into the drilled hole.
NOTE: If you want to push the kin through the knot, it's easier to push in the pin, THEN shorten it. Some of my knotted ends were on the right side, some weren't.

I checked my fabric panels to see which side looked better. That was the side I was going to let show on the windows.

I let one pin dry in place for each window so they would be secure before I started the next set of pins. I cut the pins, dipped them in glue, and pushed them about halfway into the holes. Next I pulled the curtain strings tight and wound them around the pins a few times, securing them with a dab of hot glue, then pushed the pins firmly in place. If the curtain strings sag a little, it's ok, they would in real life too.
Here's a view of one side of the room. Note I dirtied the windows in an authentic seacoast Maine manner. OK, so they got dirty without my help, but my real life windows get to looking like that very quickly, and I'm sure Amos has more important things to do than wash windows.

I had found a couple of cute duck decoys while I was out shopping, and figured Amos would like them. I placed the other one atop his kitchen cupboard.

Here's the stove side of the room.

You can see the wear and tear on Amos's cupboard. When you distress a pice of furniture, make sure you think about where normal wear and tear naturally occurs, around knobs, at the bottom, where feet, brooms and mops may continually bump against the cabinet, on the side corners where chairs may scrape or the front lip, where things may be bumped as furniture is moved, or in this case, as dishes are continually laid down while they're put away.

Star is happily playing with her puppy in her room. Furnishings are a little sparse, but that would be normal for a child around 1900 and earlier. I'm pretending her doll is sleeping in a drawer somewhere. Every old fashioned girl should have a dolly. Frankly, I didn't feel like making one, nor did I see one anywhere that I thought would suit. If I ever do, Star will get it.

Here's another picture, showing the bed better.

Oh yes, here's a view of the front corner where the benches are so you can see the plants behind them. I think the fellows were sitting there the last time I took pictures.

By the way, I heard that Amos's old faithless sweetheart Persis was back in town. You remember, the one who left him and ran off with the man on the flying trapeze? Well, it turned out that Willoughby Snavely, the trapeze artiste, was just a snake in the grass. He eventually left Persis in the lurch when a pretty young magician's assistant joined the circus. Persis hasn't improved with age, though, and Amos is steering clear of her.